NMSライセンス適用・クライアント接続
1. ライセンスの投入
予め、利用するモジュールに必要となるライセンスの情報を用意します。 以下の手順でライセンスを投入します なお、ライセンスの投入に関しては参考として記載しております。 ラボでNIMをご利用される場合はライセンス適用済みのインスタンス(NIM UI)をご利用ください。
Settings をクリックします
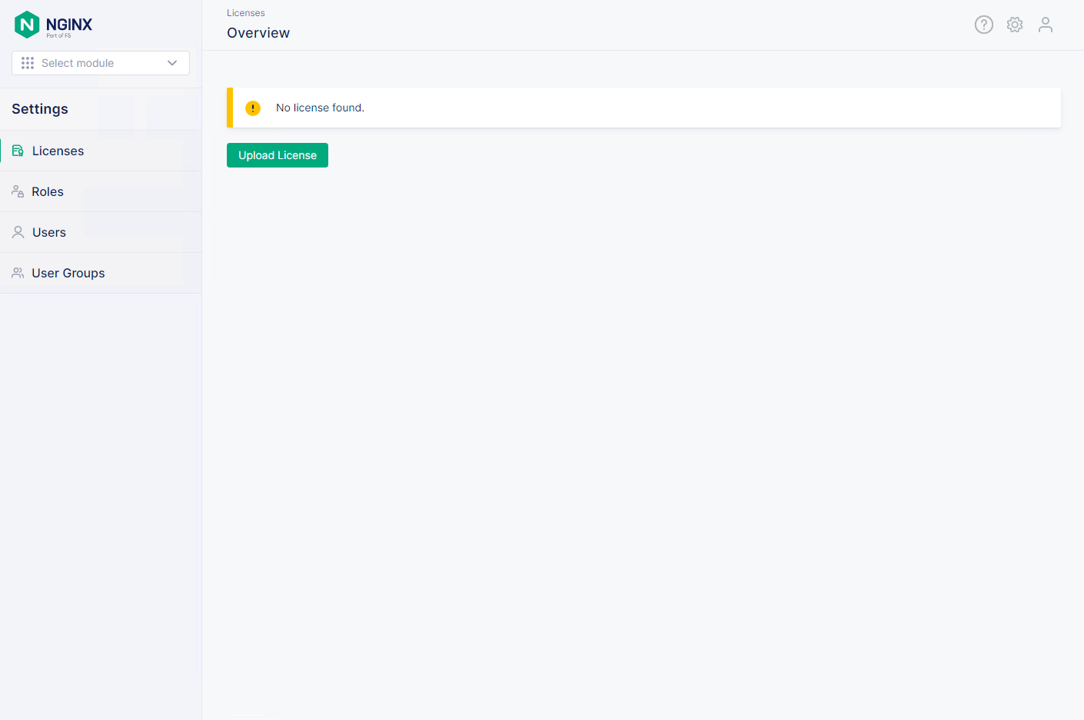
Upload License をクリックし、ライセンスファイルを選択します
管理対象となるNGINX OSS/NGINX PlusにNGINX Agentをインストールすることにより様々な操作が可能となります。
2. NGINX Agent のインストール
いくつかの環境でNMS/NIMをご利用いただくにあたり、セットアップ手順を複数紹介します。 環境にあった手順を実施してください。
1. Linuxの NGINX Agent Install
こちらの作業は Install and Configure NGINX Agent の内容を参照し、実行しています
すでにNGINXをInstallしたホストにNGINX Agentを追加します。 Kubernetes、Docker Container以外の方法でデプロイした場合、NMSをデプロイしたホストにNMSのコンポーネントと同時にNGINXがデプロイされています。
ラボ環境で動作を確認される場合、作業ホストは NIM(10.1.1.10) となります。
NMSデプロイの際に必要となる証明書と鍵は配置済みとなります。
なお、すでにライセンス適用済みのNIMインスタンスがあり、NIM UI からアクセス可能です。Username admin 、 Password は password でログインしてください。
Instance Manager > Instances の画面に表示された内容を参考に、NGINX Agent をInstallします
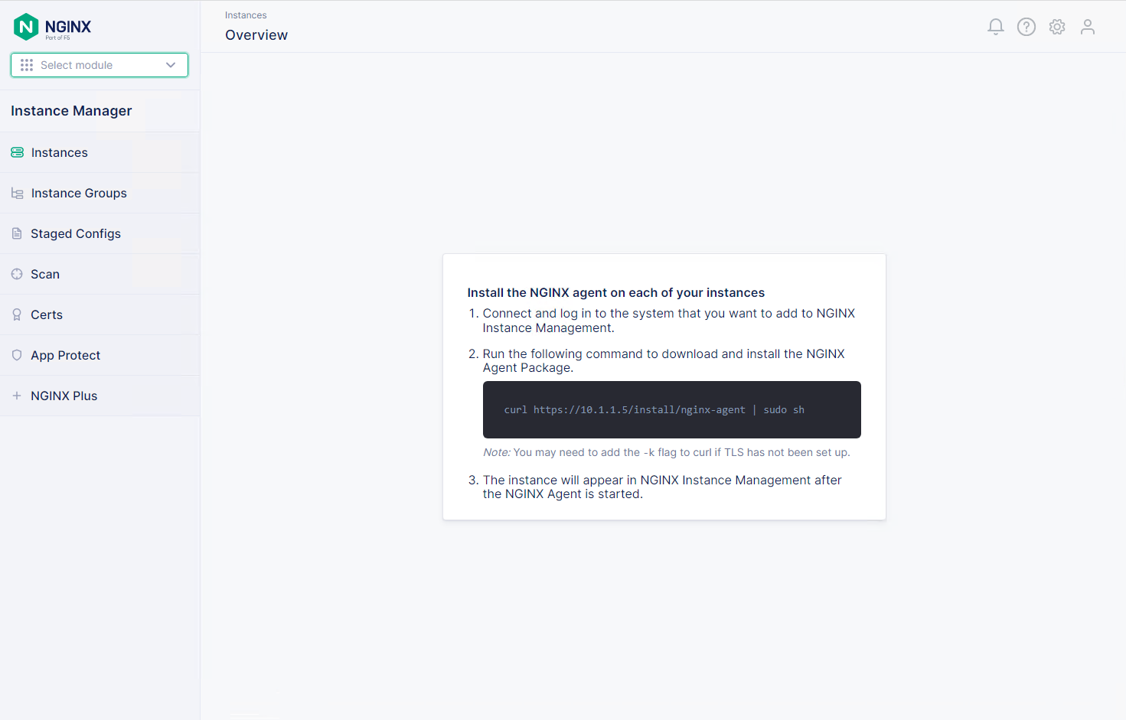
# 証明書と鍵を /etc/ssl/nginx に正しく配置し、以下コマンドを実行してください
cd ~/
curl -k https://10.1.1.10/install/nginx-agent | sudo sh
NGINX Agentを起動します
sudo systemctl enable nginx-agent
sudo systemctl start nginx-agent

sudo systemctl status nginx-agent
 1● nginx-agent.service - NGINX Agent
 2     Loaded: loaded (/etc/systemd/system/nginx-agent.service; enabled; vendor preset: enabled)
 3     Active: active (running) since Tue 2022-12-13 13:59:39 UTC; 24s ago
 4       Docs: https://www.nginx.com/products/nginx-agent/
 5   Main PID: 21479 (nginx-agent)
 6      Tasks: 9 (limit: 4652)
 7     Memory: 9.7M
 8     CGroup: /system.slice/nginx-agent.service
 9             └─21479 /usr/bin/nginx-agent
10
11Dec 13 13:59:40 ip-10-1-1-5 nginx-agent[21479]: time="2022-12-13T13:59:40Z" level=warning msg="The NGINX API is not configured. Please configure it to co>
12Dec 13 13:59:40 ip-10-1-1-5 nginx-agent[21479]: time="2022-12-13T13:59:40Z" level=info msg="OneTimeRegistration completed"
13Dec 13 13:59:40 ip-10-1-1-5 nginx-agent[21479]: time="2022-12-13T13:59:40Z" level=info msg="Commander received meta:<timestamp:<seconds:1670939980 nanos:>
14Dec 13 13:59:40 ip-10-1-1-5 nginx-agent[21479]: time="2022-12-13T13:59:40Z" level=info msg="config command &{agent_config:<details:<features:\"features_r>
15Dec 13 13:59:40 ip-10-1-1-5 nginx-agent[21479]: time="2022-12-13T13:59:40Z" level=info msg="Upload: Sending data chunk data 0 (messageId=02d98e5d-d09c-42>
16Dec 13 13:59:40 ip-10-1-1-5 nginx-agent[21479]: time="2022-12-13T13:59:40Z" level=info msg="Upload: Sending data chunk data 1 (messageId=02d98e5d-d09c-42>
17Dec 13 13:59:40 ip-10-1-1-5 nginx-agent[21479]: time="2022-12-13T13:59:40Z" level=info msg="Upload: Sending data chunk data 2 (messageId=02d98e5d-d09c-42>
18Dec 13 13:59:40 ip-10-1-1-5 nginx-agent[21479]: time="2022-12-13T13:59:40Z" level=info msg="Upload: Sending data chunk data 3 (messageId=02d98e5d-d09c-42>
19Dec 13 13:59:40 ip-10-1-1-5 nginx-agent[21479]: time="2022-12-13T13:59:40Z" level=info msg="Upload sending done 02d98e5d-d09c-42fb-b3dc-f94aec4722ef (chu>
20Dec 13 13:59:54 ip-10-1-1-5 systemd[1]: /etc/systemd/system/nginx-agent.service:23: PIDFile= references a path below legacy directory /var/run/, updating>
Instance Manager > Instances を再度開き、追加したインスタンスが表示されることが確認できます
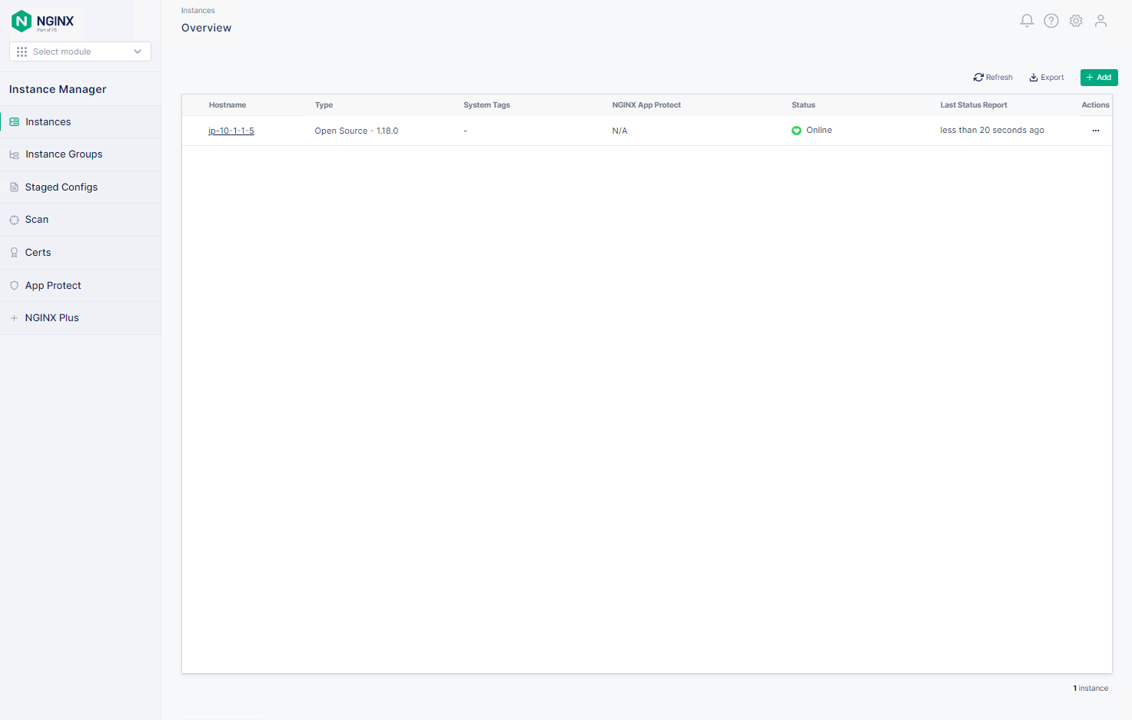
画面に表示されない場合には一度ブラウザを更新してください
2. Container ImageのAgent Install
こちらはNGINXのContainer ImageをBuildする際に、AgentをInstallする際の参考手順となります。
Container Imageの参考手順は NGINX Container Build の agent- から始まるイメージのビルド方法を参照してください。
0. 必要なファイルの取得
cd ~/
git clone https://github.com/BeF5/f5j-nginx-docker.git
cd f5j-nginx-docker/
cp ~/nginx-repo* .
1. Docker Build
Base OS Image Ubuntu20.04 , NGINX Plus, NAP WAF + NGINX Agent Docker Image をビルドするコマンドです
./buildNGINXcontainer.sh -o ubuntu20 -i agent-plus-napw -t agent-plus-napw -C nginx-repo.crt -K nginx-repo.key -n "https://10.1.1.10"
2. Docker Compose 実行
Docker Compose fileの内容は以下のような構成となります
 1services:
 2    nginx-gw1:
 3        image: agent-plus-napw:latest
 4        hostname: agent-plus-napw1
 5        ports:
 6        - "8081:80"
 7        environment:
 8         - NMS_HOST=10.1.1.10
 9         - NMS_GRPC_PORT=443
10         - NMS_INSTANCEGROUP=napw-cluster
11         - NMS_TAG=napw-proxy
3行目: 実行するDocker Image5-6行目: HTTP(8081)で待ち受けた内容を、ContainerのHTTP(80)へマッピング8-11行目: NGINX Agent ありのDocker Imageの場合以下パラメータを指定して実行NMS_HOST: NMSが待ち受けるIPアドレス(10.1.1.10)NMS_GRPC_PORT: NMSが待ち受けるPort番号(443)NMS_INSTANCEGROUP (option): インスタンス接続時にインスタンスグループに登録する場合のグループ名(napw-cluster)NMS_TAG (option): インスタンス接続時にタグを付与して登録する場合のタグ(napw-proxy)
Docker Compose コマンドを実行します。
Note
こちらの手順では agent-plus-napw のみとなりますので、Docker Compose File で参照する Image 名など適宜変更ください。
docker-compose -f docker-compose-nginx-waf.yaml up -d